A new video tutorial has been uploaded. The video covers the HP Data Protector, the first part includes basics, the architecture and licensing. To watch the video, please refer to https://www.data-protector.org/wordpress/videotutorials/. The video was recorded in English.
Category Archives: HowTo
Wie geht das? Knowledgebase, HowTo, RTFM, …
New Video Tutorial – HP Backup Navigator
A new video tutorial has been uploaded. The video covers the new HP Backup Navigator. To watch the video, please refer to https://www.data-protector.org/wordpress/videotutorials/. Thanks to Uli for recording. The video was recorded in English and German.
Distribute omnirc File
You know Data Protector? So you know that the modification of parameter for Data Protector is done in file global and in file omnirc. The file global is maintained on the Cell Server directly, but the file omnirc (Linux/HP-UX: /opt/omni, Windows 2008 C:\programdata\omniback) has to be maintained on each client individually. The Data Protector admin often maintains one version on the Cell Server and distribute the modified file manually to each individual client. That’s the case, because no distribution mechanism exist for the file omnirc, at least in the past.
With Data Protector 8.11 there is a new way to modify omnirc values for the clients, using the command util_cmd.
util_cmd -setomnirc <hostname> <name> [<value>]
util_cmd –getomnirc <hostname> <name>

name      – the name of the environment variable written in DP omnirc file.
hostname  – the name of the host on which to modify omnirc or get omnirc value from
value     – the value of environment variable to be added or modified in omnirc file.
If a value is omitted, the variable will be removed from omnirc file. If file omnirc does no exist, a new file will be generated on client. If a variable already exists, its value will be changed in-place, otherwise the new variable will be appended to omnirc file. The command can be used too for reading variables and values from clients.
Example to be used to further automate distribution of omnirc parameter (read non existing variable, set variable, read existing variable):
C:\Program Files\OmniBack\bin>util_cmd.exe -getomnirc w2012r2dp.localdomain OB2IPCKEEPALIVE
*RETVAL*0

C:\Program Files\OmniBack\bin>util_cmd.exe -setomnirc w2012r2dp.localdomain OB2IPCKEEPALIVE 1
*RETVAL*0

C:\Program Files\OmniBack\bin>util_cmd.exe -getomnirc w2012r2dp.localdomain OB2IPCKEEPALIVE
1
*RETVAL*0
EADR for Cell Server – DP 8.1X on Windows 2012 R2
With Data Protector 8.XX the process to create disaster recovery images has been changed. Since the new version, the backup of the internal database is separated from the filesystem backup of the cell server. Hence, the “makeiso.cmd” (see https://www.data-protector.org/wordpress/2011/03/recover-cell-server-with-enhanced-automated-disaster-recovery/) is no longer working. With the separation it is necessary to provide 2 session id’s for the command omniiso; a session id from the filesystem backup and a session id from the IDB backup. As a preparation for a disaster and to automate the creation of the recovery image new batch files were created. Please see the guide below and how to implement the new scripts. The guide is valid for Data Protector version 8.10 and 8.11 only and was tested with Windows 2012 R2. For Data Protector version 8.0X the scripts will not work, as the option -anyobj is not available for the omniiso command. However, with some modifications it will be possible to run the scripts as scheduled task.
[wpdm_file id=23]
Requirements and implementation:
- On cell server the correct version of the WAIK/ADK is installed. When Windows 2012 R2 is used, the version “ADK for Windows 8.1” is required.
- The batch files (see download link) are copied into the Data Protector “bin” Folder (i.e:
D:\Program Files\Omniback\bin). - The backup of the filesystems for the cell server is done using the Options “Copy Recovery Set to disk” (Filesystem Options – Advanced – Tab Other) and “Detect NTFS hardlinks”, “Backup share Information for directories” and “Use Shadow Copy” (Filesystem Options – Advanced – Tab WinFS Options).
- The backup of the filesystems for the cell server is done using a separate backup specification (no other client) and as Post-exec script the batch file
EADR_CS_FSBackup_Post.cmd(to be executed on cell server) will be inserted (Backup Specification Options – General – Post-exec). - The backup of the internal database from the cell server is created with no schedule (will be started by the filesystem backup) and as Post-exec script the batch file
EADR_CS_IDBBackup_Post.cmd(to be executed on cell server) will be inserted (Backup Specification Options – General – Post-exec). - In file “EADR_CS_FSBackup_Post.cmd” the following changes must be made: variables OMNIHOME, OMNIDATA and IDBBACKUP (name of the IDB backup specification) must be modified, depending on existing environment.
- In file “EADR_CS_IDBBackup_Post.cmd” at least the following changes must be made: variables OMNIHOME, OMNIDATA, CELLSERVER, WAIKPATH and NETWORKSHARE must be modified, depending on existing environment.
- The batch files are already prepared with variables, so see the values as example.
Example Session Messages filesystem backup:
[Normal] From: BSM@server.domain "CS_Backup_FS"  Time: 04.04.2014 11:01:57
	Starting to execute "EADR_CS_FSBackup_Post.cmd"...


Starting EADR preparation and IDB backup

Script Environment: host='SERVER' user='DOMAIN\user'
                    script='D:\Program Files\OmniBack\bin\EADR_CS_FSBackup_Post.cmd'
                    path='D:\Program Files\OmniBack\bin\'
Backup successfully started.
Session Key: R-2014/04/04-23
[Normal] From: BSM@server.domain "CS_Backup_FS"  Time: 04.04.2014 11:01:57
	The exec script "EADR_CS_FSBackup_Post.cmd" has completed.
Example Session Messages IDB backup:
[Normal] From: BSM@server.domain "CS_Backup_IDB"  Time: 04.04.2014 12:09:50
	Starting to execute "EADR_CS_IDBBackup_Post.cmd"...


Starting the EADR preparation process

Script Environment: host='SERVER' user='DOMAIN\user'
                    script='D:\Program Files\OmniBack\bin\EADR_CS_IDBBackup_Post.cmd'
                    path='D:\Program Files\OmniBack\bin\'
Creating the ISO image ...
[Normal] From: omniiso@server.domain "omniiso"  Time: 04.04.2014 12:09:55
	Creating the Disaster Recovery ISO image file. This may take a few minutes...

[Normal] From: omniiso@server.domain "omniiso"  Time: 04.04.2014 12:09:55
	Initializing MiniOS directory structure.

[Normal] From: omniiso@server.domain "omniiso"  Time: 04.04.2014 12:09:55
	Mounting MiniOS image.

[Normal] From: omniiso@server.domain "omniiso"  Time: 04.04.2014 12:10:00
	Inserting Recovery Info file into the MiniOS image file.

[Normal] From: omniiso@server.domain "omniiso"  Time: 04.04.2014 12:10:00
	Inserting hardware information file into the MiniOS image file.

[Normal] From: omniiso@server.domain "omniiso"  Time: 04.04.2014 12:10:00
	Inserting network information file into the MiniOS image file.

[Normal] From: omniiso@server.domain "omniiso"  Time: 04.04.2014 12:10:00
	Inserting ASR BCD file into the MiniOS image file.

[Normal] From: omniiso@server.domain "omniiso"  Time: 04.04.2014 12:10:00
	Copying MiniOS system files to the image file.

[Normal] From: omniiso@server.domain "omniiso"  Time: 04.04.2014 12:10:00
	Copying DRM binaries to the image file.

[Normal] From: omniiso@server.domain "omniiso"  Time: 04.04.2014 12:10:00
	Copying DRM configuration directory to the image file.

[Normal] From: omniiso@server.domain "omniiso"  Time: 04.04.2014 12:10:00
	Copying backup application depot directory to the image file.

[Normal] From: omniiso@server.domain "omniiso"  Time: 04.04.2014 12:10:00
	Storing phase 0 log file into the Recovery Set archive.

[Normal] From: omniiso@server.domain "omniiso"  Time: 04.04.2014 12:10:00
	Configuring vendor specific system images.

[Normal] From: omniiso@server.domain "omniiso"  Time: 04.04.2014 12:10:00
	Creating the MiniOS image startup file.

[Normal] From: omniiso@server.domain "omniiso"  Time: 04.04.2014 12:10:00
	Installing additional MiniOS packages.

[Normal] From: omniiso@server.domain "omniiso"  Time: 04.04.2014 12:10:17
	Installing additional MiniOS packages.

[Normal] From: omniiso@server.domain "omniiso"  Time: 04.04.2014 12:11:04
	Installing additional MiniOS packages.

[Normal] From: omniiso@server.domain "omniiso"  Time: 04.04.2014 12:11:09
	Installing additional MiniOS packages.

[Normal] From: omniiso@server.domain "omniiso"  Time: 04.04.2014 12:11:15
	Installing additional MiniOS packages.

[Normal] From: omniiso@server.domain "omniiso"  Time: 04.04.2014 12:11:20
	Installing additional MiniOS packages.

[Normal] From: omniiso@server.domain "omniiso"  Time: 04.04.2014 12:11:25
	Installing additional MiniOS packages.

[Normal] From: omniiso@server.domain "omniiso"  Time: 04.04.2014 12:11:32
	Installing additional MiniOS packages.

[Normal] From: omniiso@server.domain "omniiso"  Time: 04.04.2014 12:11:39
	Cleaning up MiniOS image, preparing it for usage.

[Normal] From: omniiso@server.domain "omniiso"  Time: 04.04.2014 12:11:39
	Injecting driver files into the MiniOS image.

[Normal] From: omniiso@server.domain "omniiso"  Time: 04.04.2014 12:11:56
	Initializing MiniOS scratch space.

[Normal] From: omniiso@server.domain "omniiso"  Time: 04.04.2014 12:11:57
	Dismounting/Committing MiniOS image.

[Normal] From: omniiso@server.domain "omniiso"  Time: 04.04.2014 12:12:18
	Writing CD-ROM ISO image to the target location.

[Normal] From: omniiso@server.domain "omniiso"  Time: 04.04.2014 12:12:18
	Successfully created the Disaster Recovery ISO image.

Saving information about used media ...
Copying generated ISO file and information about used media to network share ...
        1 file(s) copied.
        1 file(s) copied.
        1 file(s) copied.
Finished
[Normal] From: BSM@server.domain "CS_Backup_IDB"  Time: 04.04.2014 12:12:26
	The exec script "EADR_CS_IDBBackup_Post.cmd" has completed.
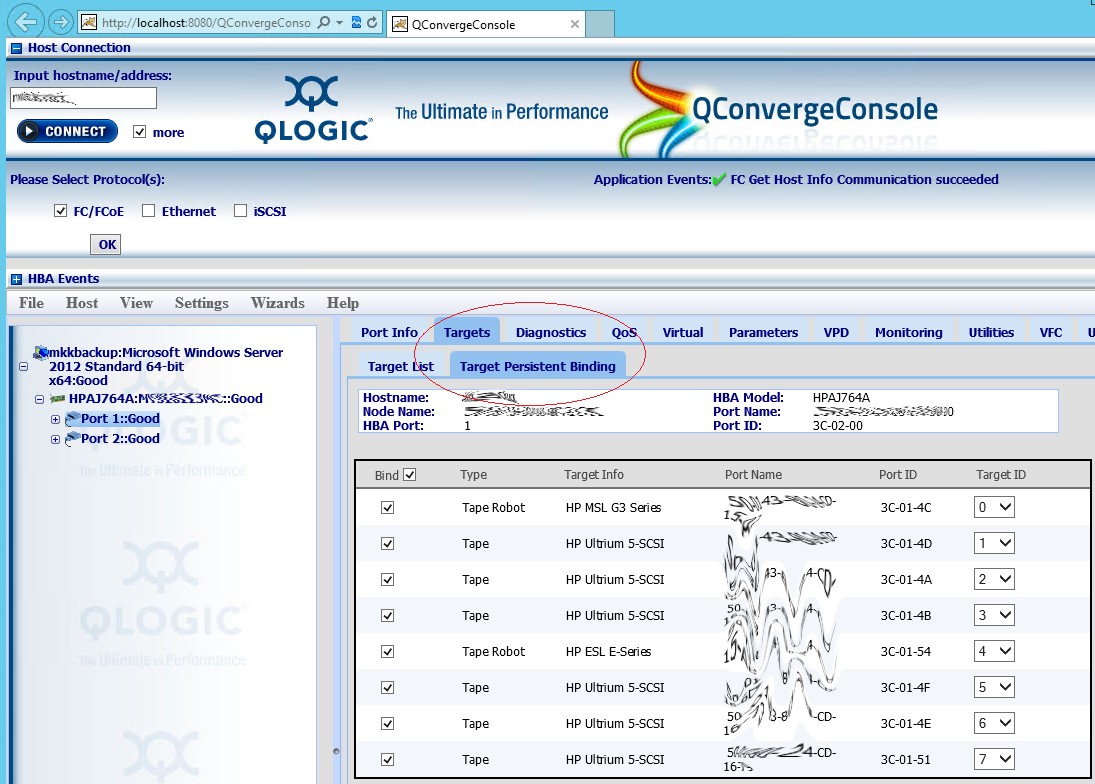
Reviewed: Persistent Binding Windows 2012
In a previous article (see https://www.data-protector.org/wordpress/2013/05/persistent-binding-hp-lto-tape-drives-windows/) I reported about “tape persistence” for Windows.
In general there is noch change to adopt this for Windows 2012 and the registry keys are the same. However, a requirement is to activate “Target Persistent Binding” for the Fibre Channel HBA. In case of a QLogic adapter you may use the tool “QConvergeConsole” (SANSurfer) for the configuration. For Emulex (HBAAnywhere) the configuration is nearly the same. After configuration and activation on the HBA, adding the registry keys and a final reboot, the tape drives and the changer can be used “persistent”. Comment: all tested with HP libraries/drives.
Example:
Registry:
Windows Registry Editor Version 5.00

[HKEY_LOCAL_MACHINE\SYSTEM\CurrentControlSet\Services\hplto]
"AutoRun"=dword:00000000
[HKEY_LOCAL_MACHINE\SYSTEM\CurrentControlSet\Control\Tape]
"Persistence"=dword:00000001
[HKEY_LOCAL_MACHINE\SYSTEM\CurrentControlSet\Control\MChgr]
"Persistence"=dword:00000001