Sorry, this article is not available in your language, as the promoted webinar is available in German only.
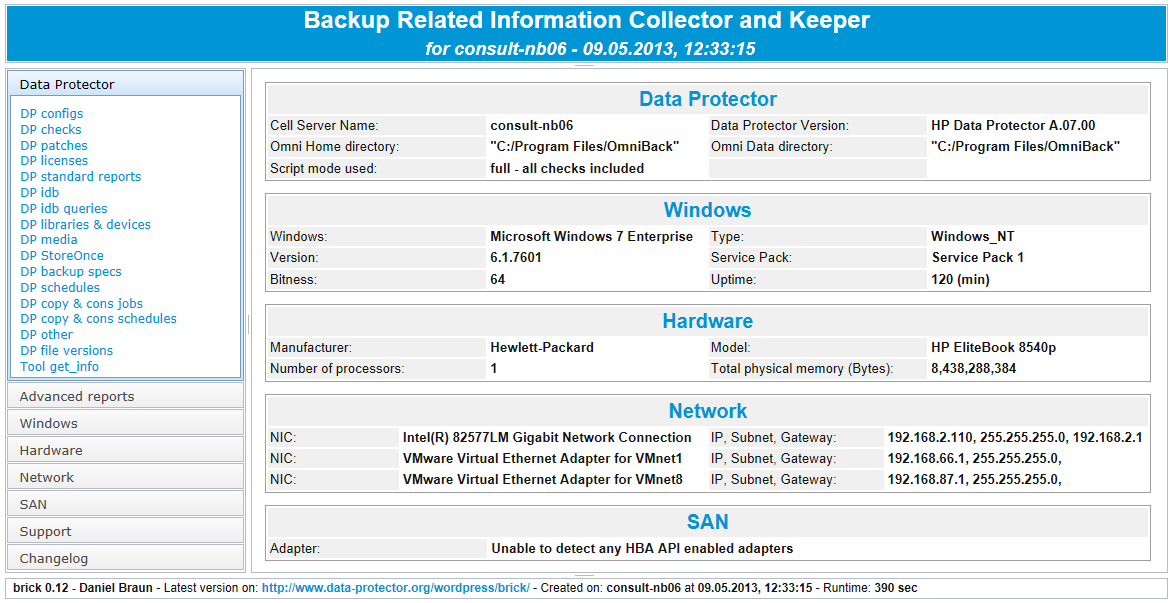
BRICK – Backup Related Information Collector and Keeper – new Version v0.12
BRICK – The new version has been released!!! Interested? Continue to read here:https://www.data-protector.org/wordpress/brick/.
Update 2012/05/14: new version (v0.12) released, for more information please refer to the ChangeLog, a lot of enhancements were done. Please use link above.
Example:
Please comment on page: https://www.data-protector.org/wordpress/brick/.
IPC Invalid Packet Size
After the upgrade to DP 7.01 in some environments the rarley error IPC Invalid Packet Size has been seen while accessing a changer or tape device. The problem might be related to a slow name resolutuion on the media agent. The INET may run into a timeout before sending data to the corresponding process. In this case you may try to increase the value for the already known omnirc variable OB2INETTIMEOUT to i.e. 30. The new value OB2INETTIMEOUT=30 has to be stored into the omnirc file on the involved media agent.
List files backed up from catalog
Have you ever asked yourself what have been backed up in a Data Protector job? In the internal database, within sessions you only see the objects done, however no information regarding backed up files and folders. You normally would see the files and folders when browsing to restore context or when using “restore by query” function in Data Protector.
With a simple command you now can retrieve the content of the backup done. The command queries the catalog of the internal database for a given session ID and object.
The command I used: omnidb -winfs server.demo.local:/F "server.demo.local [/F]" -session 2013/04/02-4 -catalog.
The output (cutted) is displayed below.
Update: If your session spawns one media only you might also use the command omnimm -catalog < medium > which delivers a similiar output. In GUI you could use the function “list from media” in restore context.
Protection    Owner    Group       Size    Time              Path
===============================================================================
d----w----       -2  nogroup          0  03.12.2012 11:04:11 /Install/NB/8540p/SWSetup/
----r-----       -2  nogroup     604672  27.04.2012 13:09:13 /Install/NB/8540p/sp48109.exe
----r-----       -2  nogroup  266051536  27.04.2012 13:16:44 /Install/NB/8540p/sp53191.exe
----r-----       -2  nogroup    8638840  27.04.2012 13:14:17 /Install/NB/8540p/sp53375.exe
----r-----       -2  nogroup   23839856  27.04.2012 13:14:48 /Install/NB/8540p/sp53394.exe
----r-----       -2  nogroup    4019352  27.04.2012 13:09:07 /Install/NB/8540p/sp53694.exe
----r-----       -2  nogroup    9721920  27.04.2012 13:14:19 /Install/NB/8540p/sp53795.exe
----r-----       -2  nogroup    8111712  27.04.2012 13:05:46 /Install/NB/8540p/sp53806.exe
----r-----       -2  nogroup   28550392  27.04.2012 13:09:34 /Install/NB/8540p/sp54149.exe
----r-----       -2  nogroup   22394016  27.04.2012 13:14:11 /Install/NB/8540p/sp54248.exe
----r-----       -2  nogroup    9481856  27.04.2012 13:18:38 /Install/NB/8540p/sp54257.exe
----r-----       -2  nogroup    4180808  27.04.2012 13:05:37 /Install/NB/8540p/sp54549.exe
----r-----       -2  nogroup   81326552  27.04.2012 13:12:07 /Install/NB/8540p/sp54600.exe
----r-----       -2  nogroup   48868760  27.04.2012 13:19:57 /Install/NB/8540p/sp54620.exe
----r-----       -2  nogroup   28575632  27.04.2012 13:12:10 /Install/NB/8540p/sp54635.exe
----r-----       -2  nogroup    6580120  27.04.2012 13:14:10 /Install/NB/8540p/sp54714.exe
----r-----       -2  nogroup    2912216  27.04.2012 13:17:53 /Install/NB/8540p/sp54740.exe
----r-----       -2  nogroup   27476040  27.04.2012 13:06:05 /Install/NB/8540p/sp54841.exe
----r-----       -2  nogroup    4711104  27.04.2012 13:09:02 /Install/NB/8540p/sp54887.exe
----r-----       -2  nogroup   24835752  27.04.2012 13:10:41 /Install/NB/8540p/sp54890.exe
----r-----       -2  nogroup  251788408  27.04.2012 13:07:22 /Install/NB/8540p/sp55192.exe
----r-----       -2  nogroup    8594016  27.04.2012 13:01:01 /Install/NB/8540p/sp56768.exe
d----w----       -2  nogroup          0  03.12.2012 10:40:50 /Install/NB/8540p/SWSetup/SP45229/
d----w----       -2  nogroup          0  03.12.2012 10:41:03 /Install/NB/8540p/SWSetup/SP46063/
d----w----       -2  nogroup          0  03.12.2012 10:41:13 /Install/NB/8540p/SWSetup/SP46768/
d----w----       -2  nogroup          0  03.12.2012 10:41:15 /Install/NB/8540p/SWSetup/SP46972/
d----w----       -2  nogroup          0  03.12.2012 10:41:16 /Install/NB/8540p/SWSetup/SP47231/
d----w----       -2  nogroup          0  03.12.2012 10:41:18 /Install/NB/8540p/SWSetup/SP47527/
d----w----       -2  nogroup          0  03.12.2012 10:41:33 /Install/NB/8540p/SWSetup/SP47593/
d----w----       -2  nogroup          0  03.12.2012 10:43:18 /Install/NB/8540p/SWSetup/SP47594/
d----w----       -2  nogroup          0  03.12.2012 10:43:29 /Install/NB/8540p/SWSetup/SP48061/
d----w----       -2  nogroup          0  03.12.2012 10:45:26 /Install/NB/8540p/SWSetup/SP48062/
d----w----       -2  nogroup          0  03.12.2012 10:45:51 /Install/NB/8540p/SWSetup/SP480
d----w----       -2  nogroup          0  03.12.2012 10:45:53 /Install/NB/8540p/SWSetup/SP48109/
Persistent Binding for HP LTO tape drives on Windows
“Tape Persistence” means that the tape drives for a tape library use symbolic names. These names stay unique during server reboots, no matter in which order the operating system discovers the tape drives. Without the feature during reboots it could be possible that the SCSI addresses are changed.
Normally the default behaviour of Windows is not a problem for Data Protector since the mechanism “Automatically detect changed SCSI addresses” will discover the new SCSI addresses using the serial number of the tape drive. However, in environments with several tape libraries attached to a server (i.e. when virtual tape libraries are used) the default Windows behaviour might mix the SCSI addresses between different library tape drives. The integrated mechanism in Data Protector will require in these cases some time to correct the problem with the changed SCSI addresses and will display some errors during the jobs. Using tape persistence the behaviour of Windows will be changed and in example a tape drive named “Tape0” becomes a symbolic name “Tape1236572535” (the symbolic name cannot be configured). With these new names error messages in Data Protector are prevented and the SCSI addresses or tape names stay unique.
To enable tape persistence for Windows copy the code below, insert into text editor and save the content as .reg file. Execute the reg file and reboot the System. In addition RSM is disabled. Don’t forget to install the HP tape drivers, the installation routine can be downloaded within the corresponding HP Library.
Update: To use persistence fot the library robotic the additional key HKEY_LOCAL_MACHINE\SYSTEM\CurrentControlSet\Control\MChgr\Persistence=00000001 is required. In this example the device Changer1:0:0:0 becomes the symbolic name Changer2147483646:0:0:0. With this feature enabled the robotic stays unique as it is the case with tape drives during reboots.
Windows Registry Editor Version 5.00

[HKEY_LOCAL_MACHINE\SYSTEM\CurrentControlSet\Services\hplto]
"AutoRun"=dword:00000000
[HKEY_LOCAL_MACHINE\SYSTEM\CurrentControlSet\Control\Tape]
"Persistence"=dword:00000001
[HKEY_LOCAL_MACHINE\SYSTEM\CurrentControlSet\Control\MChgr]
"Persistence"=dword:00000001
[HKEY_LOCAL_MACHINE\SYSTEM\CurrentControlSet\Services\NtmsSvc]
"Start"=dword:00000004